Test
Site Guide – Organization
This private page is only available to USA Softball admins and editors. This is where you’ll find helpful tips specific to your website. This page is not in the navigation, so bookmark /site-guide for future reference.
IN YOUR VIDEO LIBRARY
Basic WP Knowledge
If you’re new to CMS platforms or WordPress, this a great spot to build a foundation.
- How to create a New Article
- How to create Links and Buttons
- How to add a PDF, Video, or Audio file
- How to add a tag to an Article
- How to create pages
- How to create custom menus
- How to add widgets
- How to create/assign a Homepage
- How to Customize your Theme
- How to Install Plugins
- What are Text Blocks
- What are Media related blocks
- What are Design related blocks
- What are Widget related blocks
- What are Block Patterns
- How to Manage Comments
- How to add new users
- How to edit your profile
- WP Tools and Settings
IN THIS SITE GUIDE
USA Softball Guidelines
This site guide is more focused training specific to USA Softball’s website.
MANAGING
WP Users
WP Users are managed separately from users in SportsEngine HQ. Add new users
- Admin: Can manage all users and content throughout USA Softball
- Editor: Can edit content throughout USA Softball
- Subscriber: This level will be viewers of portal content
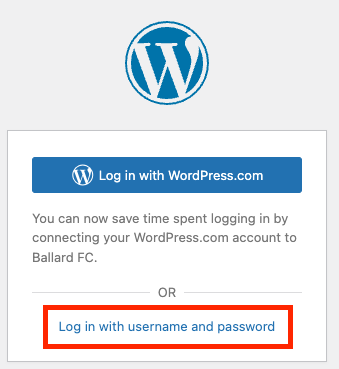
WordPress VIP is different than WordPress. Don’t log in with WordPress.com. Instead, use the username/password option.
Hi [new editor],
I’ve added you as an editor to our USA Softball website. A system-generated invitation email was sent to [email address used during user setup] from donotreply@wpvip.com (check spam, if needed). (No need to create your own WordPress login at wordpress.com.) Once you click the confirmation link, your account will be created and you’ll set up a password. Note, the confirmation link will expire in a few days.
You’ll log in here https://www.usasoftball.com/wp-admin
Now that you have access, it’s time to dive into WordPress training (located within the Dashboard of our website, under the tab “Video Tutorials“). This week you’ll want to carve out time to watch all of the training videos at least once, which should take about an hour. These videos are very basic WP concepts but will help familiarize you with key terms.
More USA Softball training content is housed on our Site Guide https://www.usasoftball.com/site-guide
If you have questions, you can start by emailing Morgan. If we’re stuck, we can reach out to websites@sportsengine.com for technical assistance.
We manage access to our portals via Groups in the Dashboard.
Create a new Group by clicking the New Group button. A name is all that’s required before saving.
To add an existing user to an existing group, check the box next to their username in the Users section of the Dashboard. You can check multiple users at a time. Select the needed group(s) and “Add to group” before clicking “Apply.”

After a user logs in, if they are part of a Group, they will be redirected to the page URL that matches the Group’s name. For example, a user in the Umpires group will be redirected to /umpires/. If the page does not exist, they will land on the site’s homepage.
START HERE
WP Powerhouses
The WordPress Dashboard is your website’s control center, offering a comprehensive range of management options. It provides access to settings, user management, and content creation tools. 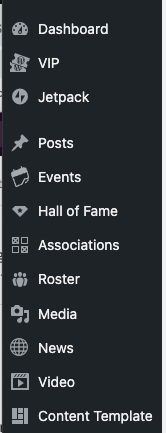 It serves as the central hub for managing your entire website.
The Customizer tool focuses specifically on customizing your website’s global appearance. It allows you to modify your menu, global ads, widgets, and other visual elements. With the Customizer, you can preview changes in real-time before applying them, ensuring you can fine-tune your site’s look to perfection.
The admin bar is a convenient toolbar that appears at the top of your website when you’re logged in as an administrator. It provides quick access to essential functions, such as adding new posts or pages, moderating comments, and accessing the Dashboard directly while you browse your website.

BUILDING + MANAGING
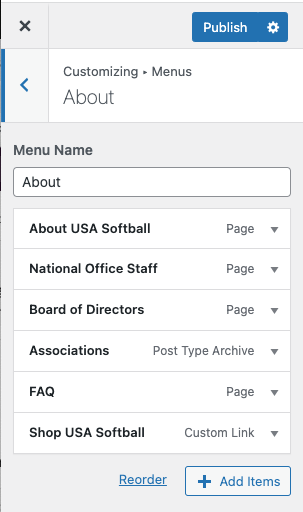
Menus
You have full control to build menus as you need:
- Pages aren’t automatically added to menus. As you create pages, you can decide if they should live in your navigation or not
- Menus can accommodate various types of content including pages, posts (like rosters, videos, articles), or links (internal or external)
“Menus” includes your main mega menu, secondary menu, and footer.
Menus can be updated in two areas:
- Appearance Menus
- Customizer Menus
- The advantage of the latter is that it allows updates to be made while previewing them on the site, as well as that it allows the easy creation of pages when adding pages.

This button title and target are updated in the Customizer Header & Navigation Featured Slot 2. When changing the title, MAKE IT ALL CAPS to match site design.

The link titles and targets are managed within Menus “Header Menu – Secondary Menu”
The search icon can be toggled on/off in the Customizer Header & Navigation Secondary Menu Featured Slot 1

Breadcrumb menus in WordPress provide a navigational aid that displays the hierarchical structure of your website, making it easier for visitors to understand their current location. To nest child pages under a parent page, go to the WordPress Dashboard, and navigate to “Pages.”
- Search for the child page that needs nesting
- Click “Quick Edit”
- Find the parent page in the “Parent” drop-down menu
- Select the blue “Update” button
If you’re on the page making edits, this setting can also be updated in the page attributes section on the right-hand side.
BUILDING + MANAGING
Content
You have full control to build Pages and Posts as you need:
- Pages and Posts aren’t automatically added to menus.
- As you create Pages and Posts, you can decide if they should live in your navigation or not
- Menus can accommodate various types of content including pages, posts (like rosters, videos, articles), or links (internal or external)
Toggle on the Document Overview view for a comprehensive look at the components on your page. From here you can click to select one or many blocks (by using the shift key). You can group items, move items, copy blocks, copy block settings. It can be easier to make some changes via this list than within the page content.
It’s been done before, so don’t start from scratch! It’s possible to copy and paste a block or a set of blocks. This is a great way to repeat design elements to ensure the site design is consistent.
- When a block (or blocks, using the shift key) is selected, select the three vertical dots to the right. (This could be in the block menu within the page content editor OR the block menu in the Document Overview view.)
- Then click copy block(s).
- Navigate to where you want to build the new content and click to place your cursor.
- Use keyboard shortcuts to paste it. Command + v on Mac; Ctrl + v for PC.
BUILDING + MANAGING
Page Basics
Be sure to watch both video linked below to understand the differences between Pages and Posts
An admin can change the slug for a page/post in the sidebar settings, under the Post/Page → ‘Summary’ section. Clicking the URL will display a panel with the permalink and the slug:

If you’d like to find the slug for a category or tag, visit Posts → Categories or Posts → Tags in the Dashboard.

Once you’ve loaded the Category or Tag page, you’ll see a listing on the right of all your current items. The Slug column will display the slug for each category.

The publishing options for pages and posts allow you to control when and how your content is published on your website.
Status
- Draft (default upon page creation)
- Published
Visibility
- Private (admin-only)
- Password-protected (type a password to see this content)
- Restricted (login to see this portal content)
Pages and posts can also be scheduled to publish by choosing a specific publish date and time.
If you want the page published but don’t want the page title to display, you can hide the title. (Don’t delete the title as it is helpful for navigation and SEO). This is a bit more hidden feature, but here’s how to find it:
- From edit mode on a page, click “Genesis” in the upper right (Genesis is the planet-looking icon)
- Under Title, check the box next to Hide Title
- Update the page to republish
BUILDING + MANAGING
Posts
Posts are specialized content with some settings and styles already configured. You will be able to fully control the Posts that appear on your site.
Roster posts will be displayed on the frontend on the Roster page. Roster posts can be accessed on the backend by clicking on Roster in the left-hand sidebar.
Adding Team Types
If there are multiple Teams needed such as Men and Women, click Type under Roster.
Individual Roster posters are referred to as Team Member posts.
When adding a new Team Type, give it a Title. The title should be the name of the Team Type (Men, Women’s, Juniors, etc). On this page you can also choose the Sort Order of the Team Members within this type. Choose from (alphabetical – first name, alphabetical – last name, or jersey number)
Adding Team Members
To add a new Team Member post, click the Add New Team Member button.
When adding a Team Member post, give it a Title. The Title should be the name of the Team Member. Below the Title is the block editor, which can be ignored, as it isn’t used for Team Members.
When adding a Team Member post, fill out the Team Member Details section, with the Uniform Number, Sponsor, & Social Media fields. Additionally complete the Roster Years, Position, and Featured Image sections. More details on these steps can be found below.
Adding Roster Types
If you have more than one roster (i.e. Men’s & Women’s) a Roster Type can be built for each. Then, when adding a player to a roster, the type can be tagged to each player, similar to position. When adding pages from the Menu, a ‘Type’ can be added to the Menu, then dragged with in the sub-menu.
Adding a Uniform Number
To add a Uniform Number to a Team Member post, look in the Team Member Details section for the Details heading – the Uniform Number field is nested below. Add the appropriate number to the field.
Adding a Sponsor
To add a Sponsor to a Team Member post, look in the Team Member Details section for the Sponsor heading. An Image (Sponsor logo), Text (Sponsor name), & Link (Sponsor website) can all be added here. Use the “Attach a File” button to add the Image. Enter the Sponsor name in the Text field. Enter the Sponsor website URL to the Link field, being sure to include https:// as part of the link.
Adding Social Media
To add Social Media links to a Team Member post, look in the Team Member Details section for the Social Media heading. For each network which will be included, enter the URL to the team member’s profile link, being sure to include https:// as part of the link.
Adding Roster Years
To apply Roster Years to a Team Member post, look in the right-hand sidebar for the Roster Years section. Click the downwards caret to expand the section. To select a Roster Year, check the box next to the appropriate year. If the desired year isn’t displayed, click the “Add New Roster Year” link, which will reveal a field to enter a name (year) and a button to add it.
Adding Positions
To apply a Position to a Team Member post, look in the right-hand sidebar for the Positions section. Click the downwards caret to expand the section. To select a Position, check the box next to the appropriate position. If the desired position isn’t displayed, click the “Add New Position” link, which will reveal a field to enter a name and a button to add it.
Adding a Featured Image
To add a Featured Image to a Team Member post, look in the right-hand sidebar for the Featured Image section. Click the downwards caret to expand the section. Click the “Set Featured Image” button which will reveal the Media Library popup. For more information on adding a Featured Image, please refer to the following video tutorial: Add a Featured Image. The information detailed in that video is universal and can be applied to all post types which use a Featured Image, such as the Team Member posts.
If you only add a Featured Image to the right-hand sidebar, the image will apply to both the Banner and Card image. If you’d like to have a unique image for both sections, navigate below the Team Player information to the Team Member Details section. You can add a new Banner image here that will display above the Player Information.. The Featured image will then only display on the main News page card. If you’d prefer not to have a Banner image at all, you can select Disable Banner Image
Sorting Teams, Positions and Players
To sort the order of one Roster team only, go to Appearance > Customizer > Roster Archive Order.
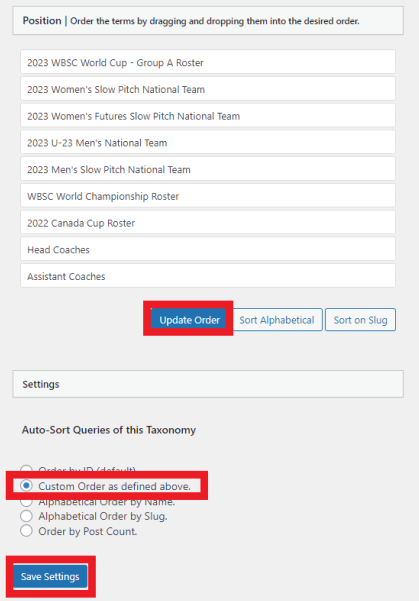
To sort the order of multiple teams, go to Appearance > Menus > Type > Select all Team Types you’d like to add. You can then click and drag to order the new tabs into the Menu as you’d like.To sort Position order go to Term Order > Order Position. You can click and drag for custom sorting, or choose between Other Auto Sort choices (alphabetical, slug, post count)
Video posts will be displayed on the frontend on the Video page. Video posts can be accessed on the backend by clicking on Video in the left-hand sidebar. To add a new Video post, click the Add New Video button.
When adding a Video post, give it a Title. Below the title, embed a video by pasting a YouTube URL directly into the block editor, such as https://www.youtube.com/watch?v=AnytgioRkNQ. Alternatively, a YouTube embed block can be used to add the YouTube URL. If any other content is to be added beyond the video, additional blocks can be inserted below the YouTube video. For more information on adding blocks and using the block editor, please refer to the following video tutorial: The Block Editor. The information detailed in that video is universal and can be applied to all post types which use the block editor, such as the Video posts.
It is not necessary to include a Featured Image with a Video post, as the embedded video will be displayed in place of an image on the archive page.
News posts will be displayed on the frontend on the News page. News posts can be accessed on the backend by clicking on News in the left-hand sidebar. To add a new News post, click the Add New News Article button.
When adding a News post, give it a Title. Below the title, add to the body of the post by adding blocks. For more information on adding blocks and using the block editor, please refer to the following video tutorial: The Block Editor. The information detailed in that video is universal and can be applied to all post types which use the block editor, such as the News posts.Additionally, when adding a News post, give it a News Tag, a Sponsor, and a Featured Image. More details on these steps can be found below
Adding Sponsors
To apply a Sponsor to a News post, look in the right-hand sidebar for the Sponsor section. Click the downwards caret to expand the section. To select a Sponsor, check the box next to the appropriate Sponsor. If the desired Sponsor isn’t displayed, click the “Add New Sponsor” link, which will reveal a field to enter a name and a button to add it.
Adding a Featured Image
To add a Featured Image to a News post, look in the right-hand sidebar for the Featured Image section. Click the downwards caret to expand the section. Click the “Set Featured Image” button which will reveal the Media Library popup. For more information on adding a Featured Image, please refer to the following video tutorial: Add a Featured Image. The information detailed in that video is universal and can be applied to all post types which use a Featured Image, such as the News posts.If you only add a Featured Image to the right-hand sidebar, the image will apply to both the Banner and Card image. If you’d like to have a unique image for both sections, navigate below the news article content to the Article Display Modifications section. You can add a new Banner image here that will display above the News Article Post. The Featured image will then only display on the main News page card. If you’d prefer not to have a Banner image at all, you can select Disable Banner Image
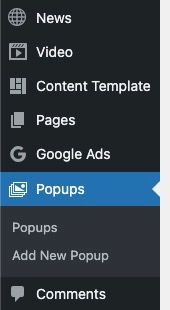
To create a PopUp for your site, you can navigate to the Popups tab on the left side navigation!
Publishing Options
- Visibility
- Who can see your Popup
- Publish Date
- What date the Popup goes live on your site.
Groups

Adding a specific group restricts the visibility of the popup to only appear for the chosen group/groups.
Popup Details

You can also set up Delays in two ways
- Popup Delay
- How long (sec.) does someone have to be on the page before the popup appears
- Popup Refresh
- How many days have to pass before the user sees the popup again
Color Options

You can change the color and opacity of the Popup’s close button, Overlay Background, and Overlay Opacity!
They will be defaulted to Black and .5 Opacity to start.
BUILDING + MANAGING
Player Profiles
Featured Image (headshot): 250px x 285
Banner Image: 1440px x 582px
Both your Roster and Player list page will auto update when adding or updating a player. Your Roster pages (including Types), and Player List page. You do not need to do anything for this to happen other than Publishing the player for the first time.
Roster posts can be accessed on the backend by clicking on Roster in the left-hand sidebar.
Adding Team Types
Team Types serve as your different teams across the organization. If there are multiple Teams needed such as Men and Women, click Type under Roster.
Individual Roster posters are referred to as Team Member posts.
When adding a new Team Type, give it a Title. The title should be the name of the Team Type (Men, Women’s, Juniors, etc). You can edit all of your team Types here.
If you want to change the order of how these teams appear on the Roster page, choose a new Sort Order below the list (First Name, Last Name, Jersey Number)
If you want to sort outside of these automated options, go to the Term Order tab, Order Type. Here you can click and drag your choices. Make sure to Update both the Order and Settings section.

Adding Positions
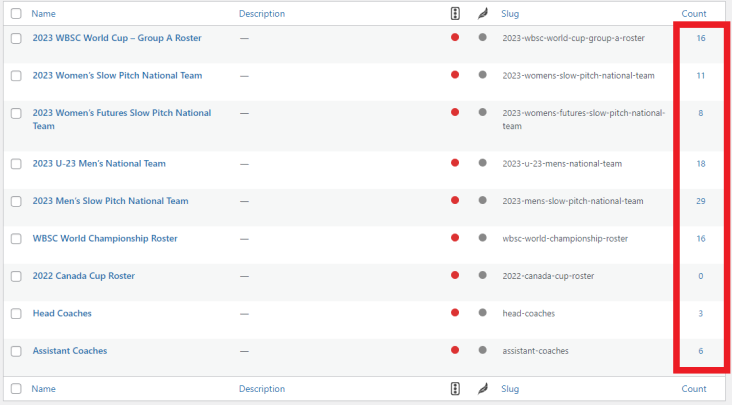
Positions are typically used for Player position (Pitcher, Infield, etc.) but we have chosen to use this as player rosters within each Team Type (2023 WBSC World Cup). You can update all Positions under the Roster tab, and see what players have been assigned to each. This is also editable on each individual players profile.
To change the order of how your Positions display on the Roster pages, go to Term Order, Order Position. Here you can click and drag your choices. Make sure to Update Order and Save Settings.
Adding Team Members
To add a new Team Member post, click the Add New Team Member button.
When adding a Team Member post, give it a Title. The Title should be the name of the Team Member. Below the Title is the block editor, where you can add the Roster Pattern. See more on that below.
Once updating the pattern scroll below the Editor to add or disable a Banner Image and add a Uniform Number.
When adding a Team Member post, fill out the Team Member sidebar settings, with Team Type, Position, Season, Sponsors and Featured Image.
Adding Player Profile Pattern
If you are adding a new player for the first time, you need to apply the Roster Player Pattern to generate the same content styles as the other players. This will ensure to generate the same styles approved in the mockups.
You can view patterns by clicking the blue + sign in the upper left of your editor. Choose Patterns, Theme, and scroll down until you find the Roster Pattern. Once selecting, it will upload to your page editor.

Updating Roster Details
Within the Roster Pattern is the Roster Details block. Enter each player’s Hometown, College, Grad Year, Website, and Social Media. If left blank, these will not appear on the player page. Toggle the Social Media off, or delete any unneeded icons.
To update the remaining fields, click the Roster Details block and go to the Block sidebar settings. Enter each player’s B/T, DOB, and Medal count. If left blank, these will not appear on the player page.

Adding Roster Types
If you have more than one roster (i.e. Men’s & Women’s) a Roster Type can be built for each. Then, when adding a player to a roster, the type can be tagged to each player, similar to position. You can tag each player in the sidebar.
When adding pages from the Menu, a ‘Type’ can be added to the Menu, then dragged with in the sub-menu.
Adding a Sponsor
To add a Sponsor to a Team Member post, look in the Team Member Details section for the Sponsor heading. An Image (Sponsor logo), Text (Sponsor name), & Link (Sponsor website) can all be added here. Use the “Attach a File” button to add the Image. Enter the Sponsor name in the Text field. Enter the Sponsor website URL to the Link field, being sure to include https:// as part of the link.
Adding Seasons
To apply Roster Years to a Team Member post, look in the right-hand sidebar for the Seasons section. Click the downwards caret to expand the section. Add new Seasons as needed or select one from the list.
Adding Positions
To apply a Position to a Team Member post, look in the right-hand sidebar for the Positions section. Click the downwards caret to expand the section. To select a Position, check the box next to the appropriate position. If the desired position isn’t displayed, click the “Add New Position” link, which will reveal a field to enter a name and a button to add it.
Adding a Featured Image
To add a Featured Image to a Team Member post, look in the right-hand sidebar for the Featured Image section. Click the downwards caret to expand the section. Click the “Set Featured Image” button which will reveal the Media Library popup. For more information on adding a Featured Image, please refer to the following video tutorial: Add a Featured Image. The information detailed in that video is universal and can be applied to all post types which use a Featured Image, such as the Team Member posts.
If you only add a Featured Image to the right-hand sidebar, the image will apply to both the Banner and Card image. If you’d like to have a unique image for both sections, navigate below the Team Player information to the Team Member Details section. You can add a new Banner image here that will display above the Player Information.. The Featured image will then only display on the main News page card. If you’d prefer not to have a Banner image at all, you can select Disable Banner Image
Sorting Teams, Positions and Players
To sort the order of one Roster team only, go to Appearance > Customizer > Roster Archive Order.
To sort the order of multiple teams, go to Appearance > Menus > Type > Select all Team Types you’d like to add. You can then click and drag to order the new tabs into the Menu as you’d like.To sort Position order go to Term Order > Order Position. You can click and drag for custom sorting, or choose between Other Auto Sort choices (alphabetical, slug, post count)
BUILDING + MANAGING
Reusable Content
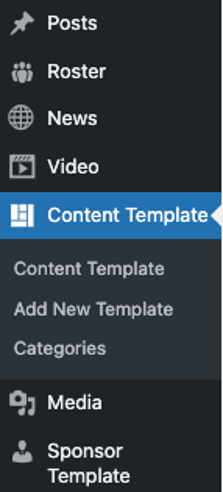
Access by appending `wp-admin/edit.php?post_type=sec_content_template` to the end of the site url.
Content Templates are reusable templates that can be utilized to speed up the process of adding content in a consistent manner when creating a new post. These can be added to any Parent or Child site for use.
Creating a new Content Template
To create a new Content Template, go to Content Template and click the Add New Template button.
On the next screen, you will be presented with the block editor interface. Give your Content Template a title, so that you will be able to identify the particular template from a list later. Next, add content that you wish to reuse when creating new posts. For example, you may wish to include paragraphs, headings, images, or a gallery. You may also wish to configure more complex layouts at this stage, such as columns or groups, so that it will be easier to incorporate those types of layouts when selecting the template for use later. When you’re finished configuring your template, click the Publish button.
Editing an existing Content Template
After a Content Template has been created, it can later be selected for editing. To edit, go to Content Template and click on the title of the template you wish to edit. On the next screen, make adjustments to your layout as needed. For example, you may wish to reorder your content, add a quote to a layout, or add some additional images. When finished making your edits, click the Update button. Any changes made to an existing Content Template will only be applied to future uses of the template. Any instances of the template having been added to a post will not be affected.
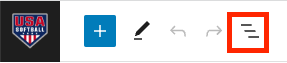
Using a published Content Template
To use a Content Template, you would go to a Post (or a page). You can use an existing post or add a new post. To access the available Content Templates, look towards the top-right corner of the site for the square mosaic grid icon. Click this to reveal any published Content Templates.
To load a template to your post, click the plus icon next to the Content Template you wish to use. You will see a popup note that states: “Apply this template? This will append the selected template to the content in the editor.” Click the Apply button to proceed. Once the Content Template has been added to your post, you can edit the content as needed. Editing the content once it’s been added to a post will only edit this specific content. The template itself will stay preserved to be reused again. You are free to add any additional content or remove any of the template content, as needed. Be sure to Save or Publish your work when finished.
Create a Reusable Block
You can turn any individual or group of blocks into reusable blocks. For example, let’s say you have a Paragraph block that you often fill with the same text and place at the end of your posts. To avoid rewriting the same content each time, you can make this content into a reusable block by following these steps:
- Select the block you’ll want to reuse.
- Click on the three dots that appear in the toolbar.
- Click on Create Reusable block.
- Give it a name.
- Click Save.
How to apply a Reusable Block
Create another post/page where you want to insert it. Click on the plus icon in the top-left toolbar, visit the “Reusable” icon and select the reusable block you want to use.

Learn more by watching the video below
Block Patterns are a collection of predefined blocks that you can insert into pages and posts and then customize with your own content. Using a Block Pattern is an easy way to create beautiful layouts that combine different blocks to produce professional designs.
To take a look at the block patterns available, follow these steps:
- From your dashboard, go to Pages or Posts and click any page or post to edit it.
- In the editor, click the + Block Inserter in the top left corner.
- Click on the Patterns tab.
- Browse through the patterns. You can click to view collections of patterns within a specific category, or click the Explore all patterns button at the bottom of that section to open the patterns in a new, larger, window.
- Click on any pattern once and it will be added to your page at the location of your cursor.
Using a Block Pattern
If you find a block pattern that you like, click it once to insert it to your page. The full pattern of blocks is then inserted into the page at the location of your cursor.
Once you insert a Block Pattern, you can change the content as much as you’d like.
ADDING + DISPLAYING
Events
Events can be managed within the dashboard to help with automating website content. By adding and editing events in the dashboard, you can update once and all instances of that event on your site will automatically inherit the updates. As the event date passes, the listing will be pulled from the aggregators automatically.
- From the Events tab of the dashboard, select “Add New”
- Each event automatically generates an Event Page with a unique slug
- Title and date are required; these will display on the Event Page and in Event Aggregators
- The remaining fields will only display if they are filled in
Each event should be categorized. An event can have one more categories. (Please note, your site does not utilize event tags.) Categories can be added on a single event by clicking into the event and checking appropriate boxes in the right-hand column. Bulk edits are possible from the Event lists (From Dashboard–> Events–> List (to the right of Events Manager title).
Please be mindful of creating new categories. Consult with Morgan Palmer if a new category is needed.
In order to have events listed in your dashboard display on your website, an Events Aggregator Block needs to be added.
An event can be tagged to one or more categories, and event aggregators can display one or more categories.
BUILDING + MANAGING
Restricted Content
This is specific to USA Softball, so careful googling your questions.
Restricted Content allows portal content to be behind a login (different than password-protected content).
- The content will need to be built and managed
- And the users who can see that content will need to be managed
Creating groups is a great way to restrict certain content to only be viewable by a specific set of people, a group for Umpires is a great example.
How to create a group
To create a group, navigate to your WordPress dashboard and select Groups located in the left panel, or click here. Select +New Group near the top of the page. Give the group a name, a description, and choose capabilities if you want to allow the users of the group to be able to have some sort of admin privileges (Name is the only required field).
If you do not want the group to have any admin privileges, just leave the Capabilities portion blank.
How to restrict content to a group
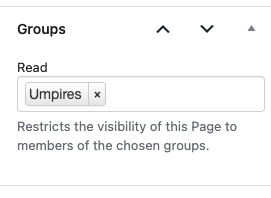
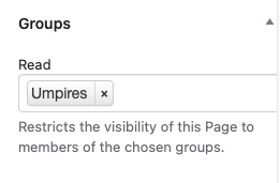
Navigate to the page or post that you want to restrict. Open the right panel, select the Page tab. In the Groups section, choose the group(s) you want to allow to view the page/post. Be sure to update the page/post once done.
How to add users to a group
To add a single user to a group, select the Users tab in the left panel of your WordPress dashboard. Locate and select the username of the person you want to add to a group. Scroll down to the Groups section, choose the group you want to add the user to. Be sure to select Update User at the bottom of the page!
Restricted content can apply to a section on a page, an entire post/page, or an entire section of posts/pages.
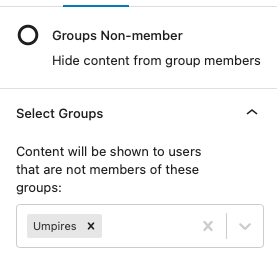
After creating a new group, you can use the Groups Non-member and Groups Member blocks to hide or show content to certain site visitors. Alternatively, you can hide the entire Post or Page’s content by assigning a Group in the Groups panel in the Settings sidebar.
To provide a simple login form on the front-end, there is a Catalog Frontend Login block.
If a user is logged out, the form will display a username field, password field, and submit button. If the user is logged in, a Logout link will display in place of the form.
After a user logs in, if they are part of a Group, they will be redirected to the page URL that matches the Group’s name. For example, a user in the Umpires group will be redirected to /umpires/. If the page does not exist, they will land on the site’s homepage.
IMPORTING + MANAGING
HOF Members and Players
Importing Hall of Fame Members
Importing is managed through the WP All Import plugin.
You can import new or existing Hall of Fame members. Keep in mind that members will be matched by name, so if you want to update an existing member, you need to match the name exactly.
Your CSV file should include the following fields (using these headers exactly):
- Name: Player Name
- Biography: Short player biography
- Hometown: City Name
- Year: Year played
- Category: This will attempt to match an existing category from the back-end. Requires an exact match though
- Image: If you’d like to upload a featured image for the player, include a URL to the image here. It will be automatically uploaded and added as the featured image.
With that CSV, visit All Import -> New Import and click the Upload a File option.
Chose your file then select the Existing Items option and Hall of Fame from the dropdown:

Click Continue to Step 2.
On the next screen, nothing is required, select Continue to Step 3.
The next screen will show you a preview of what parts of the file will import into what field. However, you can select a template to prefill these for you. If you followed the naming convention listed above, then the template will work.

Scroll down to the bottom and click the Load Template dropdown then select Hall of Fame.

Click Continue to Step 4. On the next screen, there are some final settings, but there is nothing to change here. Click Continue and then Confirm & Run Import to complete the import.
Importing Roster Players
You can import new or existing players. Keep in mind:
- Members will be matched by name, so if you want to update an existing member, you need to match the player exactly.
- Your CSV file should include the following fields (matching exactly):
- Name: Player Name
- Image: Featured Image of each Roster player (headshot). Must upload image to Media Library before importing in order to generate URL needed for CSV. See Importing Featured Images for steps.
- Team: This will attempt to match an existing team from the back-end. Requires an exact match, or it will create a new one
- Position: This will attempt to match an existing position from the back-end. Requires an exact match, or it will create a new one
- Uniform: Uniform number
- City: Hometown city
- State: Hometown state
- College: College attended
- Grad: Graduating year
- Website: Website URL
- b/t: Batting / Throwing
- Dob: Date of birth, should be formatted like MM/DD/YYYY
- Gold: Number of gold medals
- Silver: Number of silver medals
- Bronze: Number of bronze medals
Importing Featured Images (headshots):
When importing or updating athlete headshot images follow these additional steps before continuing on to Step 4:
- Image: Upload the image to the Media Library. Onced done, copy the associated URL into column B of your CSV template.
ex: https://vip.sportsengine.com/wp-content/uploads/sites/120/2023/06/image.jpeg) - Images dropdown: Open dropdown and enter this shortcode into the open field: {image[1]}

With that CSV, visit All Import -> New Import and click the Upload a File option.
Choose your file then select the Existing Items option and Roster from the dropdown:

Click Continue to Step 2.
On the next screen, nothing is required, select Continue to Step 3.
Importing Player Pattern (Biography):
The next screen will show you a preview of what parts of the file will import into what field. However, you can select a template to prefill these for you.
Scroll down to the bottom and click the Load Template dropdown then select Player.
Notice that the template loads the name shortcode AND the default pattern for each biography. If updating the player list for the first time, you can leave as is. Once the import is finished, you can update each Roster player pattern individually as needed.
If you are updating player information and and do not want certain player info updated, Delete the pattern and any cells from the CSV file as needed.


Click Continue to Step 4. On the next screen, there are some final settings, but there is nothing to change here. Click Continue and then Confirm & Run Import to complete the import.
New roster pages will be set up with the standard roster template that will auto input the headers listed in the CSV. This does not include the tabs on each player biography. These need to be manually added.
BUILD CONTENT BUT
Make It Look Good
Here’s what USA Softball’s website looked like at launch:
There are so many block options in WordPress. To help you maintain consistent content, review the Block Style Guide.
Cropping Files Keep in mind that the exact pixel size does not matter as much as the ratio. All images will scale down to the horizontal width of their column. As long as all images in same row are the same ratio, they will display the same height.
Saving Files When saving out your file, make sure that the resolution or dpi is not more than 72. Also, make sure you are saving it as a web file like a jpg or png. Only save out as a png if image needs to have a transparent background. Jpgs are smaller file sizes and are more efficient for your website’s load speed.
Optimizing Files Make sure you optimize the file with a tool like ImageOptim. This will shrink the file size without impacting quality. All these little steps will really help keep the page load speed from being negatively impacted.
Image Sizes These size recommendations serve as a guide for appropriate image sizing for images uploaded to the pre-formatted elements of the site. Uploading images that are different in aspect ratio from the intended display space will cause cropping of the image. In many cases this cropping will be minimal, but in some cases can crop essential parts of the image.
For example, a rectangular image won’t fit into a square view port without cropping the excess image.
Reducing the scale of images is essential to keeping a website loading quickly. Modern digital images taken with cell phones or digital cameras create images that are way larger than needed for website display, so uploading images without resizing will quickly add up and slow down the website performance.
For a free online resource for resizing images:
https://www.adobe.com/express/
For further image ratio and sizing information:
https://calculateaspectratio.com/
| Element | Aspect Ratio | Width x Height (pixels) |
|---|---|---|
| CTA ad image next to Leaderboard Ad | 5:3 | 300 x 180 |
| Full width billboard image | 21:9 | 2000 x 857, 1800 x 772 |
| Call to Action (CTA) | 3:2 | 600 x 400, 450 x 300, 300 x 200 |
| News image (for card and article page) | 3:2 | 1800 x 1200, 1500 x 1000 |
| Event card | 16:9 | 400 x 225, 320 x 180 |
A NOTE ON
Third-party Code
As SportsEngine does not own or control third-party code, there may be style or function limitations outside our control.
Further, using third-party code may conflict with the platform and site design code already running on USA Softball and may impact site function or performance.
There is a custom post type called Google Ads. Go to Add New Google Ad to add a Title, Ad Tag Slot, Ad Tag Div ID, Width and Height.
Step 2 – Optional – On the Customizer page, there is an area called Google Ad Globals. From there you will see one dropdown for Desktop and one for Mobile. Each dropdown contains the posts set up in step 1.
Step 3 – On an individual page, add the block called SE – Google Ads. On the right sidebar you’ll see a few dropdowns, again, one for Desktop and one for Mobile. If you have selected global ads from the customizer (step 2), these will be your defaults. No more action required. If you don’t want to set globals, or you want to override your global settings, you can select a different ad from the dropdown. Those are also pulled from the post types set up in step 1. Finally, if for whatever reason you really want to add in your tag slots and div ids manually, you can override all the above settings and add those in the text areas below the dropdowns.Any custom css needed to style the ads can be added in the Style textarea. The <style></style> tags are not required.
Leaderboard Ad + Square Ad
The leaderboard ad and square ad are displayed at the top of each page, above the navigation. It is possible to add either a custom image and link, or a Google Ad, into this slot. To add or update the leaderboard ad, go to Appearance -> Customizer, and select the Leaderboard Ad section.
The first option is Display Leaderboard which can be used to turn the ad slot off entirely. Below that, there is an option to add a Google Ad slot, which can output both a 970×90 desktop ad and a 320×50 mobile ad, which will automatically display in the right mobile context. For each Ad type, add the Tag Slot and Div Id.
If you would rather use a custom image and link, upload an image to the Image field and add a URL to the Link field.
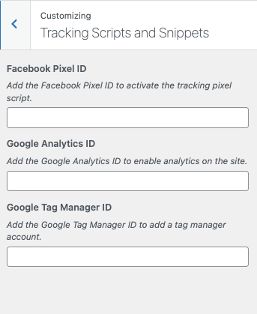
Global Tracking Scripts
Instead of adding your tracking codes into the Header or Footer script area, we have added a panel on the Customizer > Tracking Scripts and Snippets. This now includes an option for Facebook Pixel ID, Google Analytics ID, and Google Tag Manager ID. When adding to these sections the ‘ID’ is only necessary. If you have tracking codes outside of these options, then using the Header/Footer script area will be necessary.
Individual Tracking Scripts
If you need to add a script to a single page, or group of pages, you can do so on each page under the main Editor.

The HTML block in WordPress can be used to display third-party code on your website. Here’s how you can do it:
- In your WordPress dashboard, go to the page or post where you want to insert the third-party code.
- Click on the (+) icon to add a new block and search for “HTML” in the block search bar.
- Select the “Custom HTML” block from the search results. This will insert an HTML block into your content area.
- Inside the HTML block, paste the third-party code that you want to display on your website. This can be any HTML, CSS, JavaScript, or other code provided by the third party.
- After pasting the code, click outside the HTML block to save the changes.
- Preview or publish your page or post to see the third-party code in action on your website.
It’s important to note that when using third-party code, you should be cautious and ensure that the code is trustworthy and secure. Improperly implemented or malicious code can have negative effects on your website’s functionality and security. Always review and test the third-party code before adding it to your WordPress site.
MAINTAINING
Accessibility
While WordPress provides tools and features to support accessibility, it is important to note that maintaining site accessibility ultimately rests with the site administrators. It is the responsibility of the site owners and administrators to utilize the available tools, follow best practices, and ensure that their WordPress site is accessible to all users.
Complete Guide on Everything Accessibility:
Color Contrast Checkers
Accessibility Scanning Tools
- Accessibility Insights for Web
- Tota11y
- AxeDevTools – Accessibility Testing
- Tabbing Order Tool
- DevTools Enablement – Firefox and Chrome (add section and anchor URL)
Best Practices/FAQ
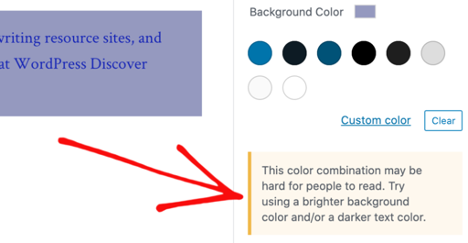
To pass Level AA compliance, each color contrast ratio must be 4.5 or above. If you are unsure of a color combination reference the Helpful Resources tab above for Color Contrast checker tools.
We understand fonts and colors are essential components on your site. Adding personality, style, and strengthening your visual identity online is key to branding. Avoid font styles and sizes and color palettes that make your site difficult to read, and pay attention to contrast, or the difference between the darkness of your text and the lightness of your background.
The editor will display an error message in Color settings when it detects poor color contrast in the specific block you’re working on:
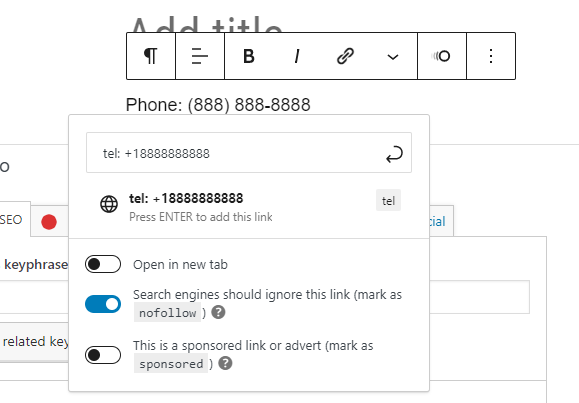
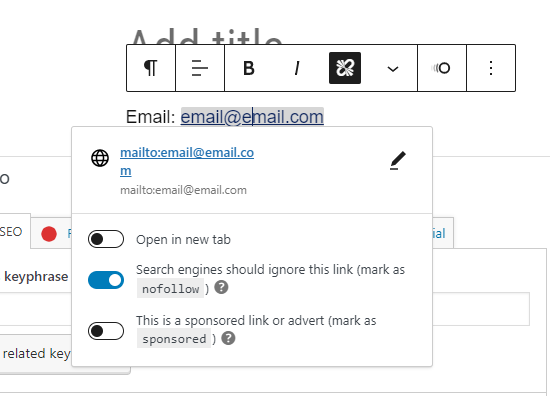
This section applies to all links added within your Main Menu tabs, Button, and Link blocks (including email and phone numbers)
Internal Links are any links that take a user to another page of your website within usasoftball.com. When adding these links within pages stay away from linking text as simple as ‘Click Here’ or ‘Learn More’. Screen readers need to know what they’re reading. Use links like ‘Click to Learn More about Tournament Schedule’ or ‘Learn More about our Hall of Fame Members’. This gives the reader context on why they would click on the link.
External Links take you outside of your website. When adding links to any page, ensure you have them Open in a New Tab.
Phone Numbers:
Link phone number using format below with nofollow toggled on
(tel: +1234567890)
Emails:
Link emails using format
(mailto: email@email.com)
Instead of using generic link text like “click here,” use descriptive text that conveys the purpose or destination of the link. This allows screen reader users to understand the context and relevance of the link.

The Alt Text helps visually-impaired users of screen readers because it is a textual description of what is in the image. The alt text is also read by search engine crawlers.
You can write Alt Text for an image in the settings of the Image block.
You can also update Alt Text for all images within the Media Library. We suggest a regular audit to ensure your maintaining the site’s accessibility.
Utilize proper HTML heading tags (H1, H2, H3, etc.) to structure your content hierarchically. This helps screen readers understand the organization and flow of information on your site.
Best Practices to follow:
- Each page has a title (H1)
- Each page with a title should only have H2 and below added to the page editor.
- Important: If header tags are in correct order but are not correct size or style, you should update the Typography size setting or CSS styles. DO NOT change to incorrect order out of need to change style.
To assess the accessibility of your site, you can use screen reader testing tools. One popular option is the NVDA (NonVisual Desktop Access) screen reader, which is free to download and use. Install NVDA on your computer, navigate to your site, and test its usability by interacting with various elements using the screen reader.
At this time the YouTube or Vimeo block should only be used for adding videos to websites because they are compliant with Level AA Accessibility. All videos must have options for Pause, Mute and Closed Captions.
Iframe codes are not generally recommended. If you have no other choice, ensure a label is added to your html code to tell readers what is inside the container.
<iframe src="https://www.usasoftball.com" title="USA Softball Homepage"></iframe>Using Clear Language
- Don’t use dashes if you can avoid it. Instead of writing 5–7, write 5 to 7.
- Expand abbreviations — instead of writing Jan, write January.
- Expand acronyms, at least once or twice, then use the <abbr> tag to describe them.
Emphasis or Strong Language Do’s and Dont’s
- Style Only - If text should be bolded or italicized for style only, follow these rules:
Dont’s -
- Do not add red or other colors to emphasize a message. Use the acceptable methods below.
- Do not use <b> or <i> tags. This is a Level A error and will not be announced to screen readers.
Do’s -
The best way to ensure screen readers know when to pay attention to emphasized language is writing in the text. Not all screen readers recognize tags and markups within their default settings.
Examples:
- This technique led to a 30% increase, yes, a 30% increase, in sales.
- Important! Do not put petrol on the fire.
- Use <strong> or <em> tags for emphasis. DO NOT use <b> or <i> tags.
A site map is essential for accessibility compliance on your website because it assists with navigation, especially for users with disabilities. It helps users understand the website’s structure, aids screen reader compatibility, provides an alternative navigation option, improves content discoverability, and ensures compliance with accessibility standards and guidelines like WCAG. Overall, a site map enhances the user experience and promotes inclusivity.
Your site map should be updated each time you create a new page.
This needs to include a section for: Pages, Social Media, PDF’s, and any other external links.
MAINTAINING
Performance
While WordPress provides tools and plugins to optimize site performance, it is important to note that maintaining site performance ultimately lies with the site administrators. It is the responsibility of the site owners and administrators to utilize the available tools, implement best practices, and regularly monitor and optimize their WordPress site for optimal performance.
Keep your media library organized and free from unnecessary files. Only upload and use images and media files that are required for your site. (You can use one file on multiple pages and posts; only upload assets once.) Regularly review and delete any unused or redundant media files to keep your media library streamlined.
Performance is based on what’s on the whole site, not just a single page.
Compress and optimize images before uploading them to your WordPress site. See more under Build Content but Make it Look Good.
NBC Sports Next takes a proactive and comprehensive approach to optimize customer websites for peak performance. We combine robust infrastructure, code optimization, performance monitoring, expert support, and continuous improvement to deliver an exceptional hosting experience tailored for high-performance sites.
By utilizing a robust and scalable infrastructure, we employ an enterprise-grade hosting environment with advanced caching systems, load balancers, and Content Delivery Networks (CDNs) to ensure fast and reliable website performance.
We consistently minify and combine our CSS and JavaScript files to reduce file sizes. We also manage (and limit) the plugins on your site.
The CMS platform also includes built-in image optimization features. All images uploaded to your site are stored on an external file system. Media files that are uploaded to your site are not stored on the web container’s filesystem. Instead, an API is used to store the uploaded files in a separate read-only service. This enables the application to automatically horizontally scale more efficiently across multiple hosts.
The file system automatically serves images that are:
- Converted and provided as next-gen formats to compatible browsers, including *.webp files
- Responsive with srcset attributes
- Dynamically resized, cropped and processed
- Cached at the edge
MAINTAINING
SEO
Yoast SEO is already a plugin already activated on your site and is there to help you optimize your site’s content and keywords. A lot of what Yoast SEO does is automated, but still needs your input and some planning.
To effectively manage and update the Yoast SEO plugin on your site, follow these best practices:
- Configure the General Settings: Go to the Yoast SEO settings page in your WordPress dashboard. Review and configure the general settings based on your website’s needs. This includes setting a preferred site title and meta description format, choosing a default social media image, and enabling advanced features like XML sitemaps.
- Optimize Content with the Yoast SEO Meta Box: When creating or editing a post or page, you’ll find the Yoast SEO meta box below the content editor. Utilize this meta box to optimize your content for search engines. Set a focus keyword or keyphrase, write an SEO-friendly title and meta description, and use the content analysis tool to improve your content’s readability and keyword usage.
- Customize XML Sitemaps: Yoast SEO generates XML sitemaps to help search engines understand your site’s structure and content. Navigate to the Yoast SEO settings and go to the XML Sitemaps tab. Customize the settings, such as including or excluding specific post types or taxonomies, and submit your XML sitemap to search engines using tools like Google Search Console.
- Utilize Yoast SEO’s Content Analysis: Yoast SEO provides a content analysis tool that evaluates your content’s SEO aspects. Pay attention to the readability and keyword analysis suggestions to improve the quality and optimization of your content.
- Stay Informed with Yoast SEO Blog and Documentation: Yoast maintains an informative blog and documentation section on their website. Stay updated with the latest SEO trends, tips, and features by regularly checking these resources.
- Regularly Review and Optimize: Set aside time to review and optimize your website’s SEO performance using Yoast SEO. Analyze the SEO analysis and insights provided by Yoast, identify areas for improvement, and make necessary adjustments to boost your site’s visibility and rankings.
By following these best practices, you can effectively manage and update the Yoast SEO plugin on your site, improving your website’s SEO performance and visibility in search engine results.
Friendly names contribute to SEO. Read the overview in Page Basics section.
The slug structure in URLs is important for SEO because it helps search engines understand the content and context of a web page. Here’s why it matters:
- Relevance and Keywords: Including relevant keywords in the slug (the part of the URL that comes after the domain) provides search engines with additional signals about the page’s topic. When search engines analyze a URL, they consider the keywords present in the slug to determine the page’s relevance to a particular search query. By optimizing the slug with appropriate keywords, you increase the chances of your page appearing in relevant search results.
- User Experience: A well-crafted slug contributes to a better user experience. It offers users a clear and concise preview of the page’s content based on the words used in the URL. A descriptive and readable slug enhances the user’s understanding of what to expect when clicking on the link in search results, making it more likely for them to click through to your page.
- URL Sharing and Link Building: When sharing URLs or acquiring backlinks, having an optimized slug makes the URL more appealing and informative. People are more likely to click and share links with readable slugs that provide an idea of the content. Additionally, when others link to your page, the keywords in the slug can help anchor text relevance, which can positively impact your SEO efforts.
- Search Engine Crawling and Indexing: Search engine crawlers use URLs to discover and index web pages. A well-structured slug helps crawlers understand the content hierarchy and organization of your site. It enables them to categorize and rank your pages appropriately in search results, improving the overall visibility and accessibility of your content.
The “no follow” attribute is used when you want to instruct search engines not to follow a specific link, while “no index” is utilized in the robots.txt file to prevent search engine bots from crawling and indexing specific pages or directories on a WordPress site.
“No follow” is a toggle available when you’re setting a link target.
“No index” would be CSS added to a Page Settings.
Making a page private does restrict access to the page for non-logged-in users. However, it does not inherently prevent search engines from crawling or indexing the page. By default, search engines may still discover and index private pages, particularly if they are linked from other publicly accessible pages.
If you want to ensure that a page is not crawlable by search engines, in addition to making it private, you can also add a “noindex” directive. This can be achieved by using a plugin that allows you to set the “noindex” meta tag for specific pages, or by modifying the page template to include the “noindex” meta tag manually.